GPM20AT – Minting Time!

Spooky

So the end of the semester has arrived, and now I actually have to mint some NFTs for the students in celebration of them being the last batch of students to ever pass the GPM20AT module.

This article will explore the different NFTs to be minted and give a little explanation of why they are the way they are.

Just wanna see them? Here they are:

https://opensea.io/collection/gpm20at

Why Ghosts?

>Insert joke about how Cardano is a ghost chain<

The end project for GPM20AT is the creation of a 3D version of Pac-Man. This includes the construction of the maze, as well as the AI that powers the various ghosts. I chose the ghosts for the NFTs as they were much more photogenic than that Pac-Man guy who usually gets all the attention. (Also, the Pac-Man was literally just a sphere in my tutorials, lol; we focus on AI much more than the aesthetics—that’s the multimedia department’s job).

So these ghosts are modified versions of the ghost I used to illustrate various AI behaviours during the semester.

Why OpenSea?

So I chose to mint to OpenSea simply because they are the most popular NFT marketplace. It needs to be as accessible as possible for my students, of whom many have never even used a crypto wallet yet.

https://opensea.io/collection/gpm20at

Those Who Never Made It 0-49%

All those who did not manage to pass will receive one of these:

Fail Ghost

So, nothing special – just a static image who cannot bear to look at you or your poorly constructed maze. It’s also taken from the scene view because we all know your game is probably not running 😛 (If you received one of these, don’t worry. There is more to life, you will be fine—just learn from this and take action in the future). It’s also red, the colour of failure…

Those Who Barely Made It 50-60%

This goes to those who somehow managed to scrape by. Most likely they put in at least SOME effort, but not enough to really make a mark. Your ghost can at least look at you and has the maze you painstakingly built as the backdrop. Coloured green as that’s the colour of a pass:

Pass ghost

A Good Pass 61-80%

Here we have your efforts coming full-circle, resulting in your ghost giving you a full, loving stare as reward.

Almost a Genius 81-90%

Here we have the real hard workers that are rewarded with 3 moments of direct eye contact and flashing colours (he’s happy to see you <3).

The Top 91-100%


The cr̬me de la cr̬me, as they say. These NFT owners have given their all and spent many sleepless nights Рrepresented by the red eyes of the ghost, while the quality black, polished finish of the maze walls signifies all the hard work that went into the achievement. Well done!


Fun fact. NOBODY GOT ABOVE 90% to get this one! Read update below 🙂

UPDATE

My department decided to let learners register again (effectively extending the phase-out process by 6 months) so… Looks like there will be one more (probably smaller) batch of these. Hopefully someone can claim the flashy red-eyed ghost!

Share

GPM20AT – end of an era

I joined TUT for the sole purpose of learning games programming. Back in 2006 this was taught by Dr. James Jordaan.

The content of the module has evolved over the years but at its core, it was always AI.

The end of this semester (2022_01) marks the last batch of students who will ever pass or fail GPM20AT. The course has been phased out and is being replaced with a new shiny course that combines Intelligent Industrial Systems (IIS) with Computer Systems Engineering (CSE). This is a good thing BTW as now all graduates will be ECSA-accredited engineers, not only the CSE graduates as was the case in the past.

“That’s the beauty of Unity – it’s a skill that can unlock many doors”

– Abraham Lincoln

Unity in GPM20AT

I managed to convince the powers that be around 5 years ago that we should switch to using Unity as a tool for teaching AI and we have never looked back. It has enabled students to get into various careers using Unity and not just in AI or even games programming. That’s the beauty of Unity. It’s a skill that can unlock many doors.

Don’t be too sad about the end of GPM20AT, though. I was part of the team designing the new curriculum, so Unity will still be around in ARI216D (Artificial Intelligence). Here we are learning great things through Unity’s Machine Learning Agents (Reinforcement learning is AMAZING if you haven’t had a look at it yet) as well as general “data-sciency” content.

Celebrating with NFTs

To commemorate the occasion, I will be giving each student an NFT that has different characteristics based on their performance.

The idea is—the better the performance the “shinier” the NFT.

Details in next post which will hopefully be soon.

Share

CSE Vision – Part 4

New Card Design

Thanks to the lockdown due to COVID-19, I managed to perform a much-needed upgrade to the CSE Vision application. I have now fully migrated the system to Python using the Django framework.

This should make it easier to add the newer features that I will hopefully be adding soon (integrating the app with data from ITS for one) as well as allowing for easier more streamlined project development. It’s of course always an advantage to just learn a new, relevant skill. You never know when it might give you access to great new opportunities.

The first major change I have made is the ability to search for a lecturer on the home page. This works using AJAX which thankfully was not too difficult to implement although it understandably took me longer to do than it would have in PHP (which is what I was using previously). The lecturer cards have also been completely redesigned. Take a look at it in action here:

You’ll notice the lecturer cards now also have two buttons added. One will send an email to the lecturer and the other will allow you to favourite a lecturer so that when you log in, you only see the lecturers that you care about. Oh and of course it is now fully responsive and should look good on most displays.

So yeah, in terms of general aesthetics I think it’s looking much better now. Now comes the hard work of integrating the app with all the user data.

Share

World’s First Image of a Black Hole!

Today, for the first time ever — we have an actual image taken of a black hole!

Specifically, the black hole at the centre of the Messier 87 (M87) galaxy which is 55 million light-years away from us. Everything you have seen previously were artistic impressions of what we thought black holes would look like. The astounding photo was taken by the Event Horizon Telescope (EHT), a network of eight radio telescopes including such varied locations as Antarctica and Spain. More than two-hundred scientists were involved in this massive scientific effort.

Courtesy of the National Science Foundation

So what am I looking at?

You are looking at the accretion disk (gas, dust and other material in space that has come close to a black hole but not quite close enough to be sucked into it) of a black hole with a mass of 6.5 billion times that of our own sun. The black hole itself is essentially invisible to us because nothing, not even light, can escape the gravitational field created by it. Thus, the dark circular shape you see in the image is the black hole, as well as something called the event horizon. The event horizon defines the area around the black hole from which no light or matter can escape. This is why the circular shape shown is not the black hole alone but rather the black hole and its generated event horizon.

How was the image taken?

The image was taken by 8 radio telescopes here on Earth using something called Very-long-baseline-interferometry which basically creates a virtual telescope about the same size as the Earth. Because these are radio telescopes and not optical telescopes, we are actually looking at the radiation emitted by the material surrounding the black hole (the brighter the colour, the more emitted radiation) and not an actual optical photograph. This is incredibly useful as it allows us to “see” the material around the black hole from much farther away than with an optical telescope . These telescopes generated astonishingly large amounts of data (5,000 trillion bytes worth!) and it took two weeks to compile all the information generated into the image we now have using supercomputers.

Is this what was expected?


The chair of the EHT Science Council, Heino Falcke said before the photo was revealed: “If immersed in a bright region, like a disc of glowing gas, we expect a black hole to create a dark region similar to a shadow — something predicted by Einstein’s general relativity that we’ve never seen before.” He added, “This shadow, caused by the gravitational bending and capture of light by the event horizon, reveals a lot about the nature of these fascinating objects and allowed us to measure the enormous mass of M87’s black hole.”
So this was what they expected to see and it confirms once more Einstein’s theory of general relativity.


EHT board member and Director of the East Asian Observatory stated: “Once we were sure we had imaged the shadow, we could compare our observations to extensive computer models that include the physics of warped space, super-heated matter and strong magnetic fields. Many of the features of the observed image match our theoretical understanding surprisingly well. This makes us confident about the interpretation of our observations, including our estimation of the black hole’s mass.”


The laws of our universe as we know them remain unchanged, fortunately (or unfortunately depending on how you see it), and Einstein’s major achievement remains unshaken.


If you’re interested in the scientific journal papers written on this, you can see them here at The Astrophysical Journal Letters.


Edited by:

Faris Šehović

Share

South Africa’s 5 Worst Data Breaches

With the continuing advance of technology and an ever-growing amount of personal data on the Internet, the number of cyber attacks has steadily been increasing over the years. The Republic of South Africa, as a major emerging national economy, is no stranger to cyber attacks—ranging from simple spyware attacks to data breaches affecting millions of people.

Together, we delve into the 5 worst data breaches in South African history, ranked by BreachLevelIndex.com.


#5 – Government Communication and Information System (GCIS)

In a now-infamous attack on African governments in 2016 by the Anonymous collective, GCIS was targeted and lost 33,000 records to the attack.

The GCIS is a South African government department whose primary task is to manage communication with the public about government actions and policies.

How it happened

Vermeulen (2016A) reports that the hackers managed to access an old GCIS portal that is no longer used by most GCIS members. They also report that the leaked information is outdated (Vermeulen, 2016A).

What they lost

There were a total of 33,000 records that were obtained by Anonymous but only the details of government employees – which numbered 1,500 – were made public.

Names, phone numbers, email addresses, and hashed passwords of around 1,500 government employees (Breach Level Index, 2017; Business Tech, 2017; Polity, 2013).


#4 – Traffic Fine Website ViewFines

Business Tech and Fin24 reported that nearly 1 million personal records of South Africans were publicly exposed in this large leak. This happened on 23 May 2018.

Close to a million (934,000) personal records of South Africans have reportedly been publicly exposed online, following what appears to have been a governmental leak.

How it happened

The specifics are unknown but the breach was once again made public by HaveIBeenPwned.com.

What they lost

Names, identity numbers and email addresses of South African drivers stored on the ViewFines website in plain text.


#3 – Ster Kinekor

This breach is what was and is still South Africa’s largest recorded data breach ever and was at one point the 20th worst breach in the world (June 2017) but has now fallen to 115th (19 March 2019).

More than 1.6 million accounts were leaked in total. This includes my account details, actually — and I did not even know about this until months after it happened!

How it happened

A hacker managed to exploit an enumeration vulnerability (a process whereby hackers can find out an account’s username from the feedback a site gives them)  on Ster Kinekor’s old website to gain access to the database records. Ster Kinekor have a new website now and the vulnerability is no longer present.

What they lost

According to HaveIBeenPwned.com — which you should check out, by the way, as it lets you know if your personal information has been leaked into the internet — the compromised data includes: dates of birth, email addresses, genders, names, passwords, phone numbers, physical addresses and languages spoken.


#2 – The South African Government (and Others)

Approximately 30 million records were leaked. Reported by multiples sources once more, it appears as if the most recent data contained in the breach came from the deeds office as the file containing the data was titled: “masterdeeds.” It is difficult to get a time frame for this breach as the file appears to contain data from multiple sources. The file was last modified in March 2017 which is an indicator of when the most recent breach took place but there is data in the file that dates back to the early 1990s.

How it happened

Due to the nature of the contents of the file (containing many different types of data from many potential sources) it is difficult to determine how it happened. It should be noted, however, that one can query data from DeedsWeb — the website of The Department of Rural Development and Land Reform.

What they lost

Addresses, income, living standard measure, contact information, employment status and title deed information.


#1 – Jigsaw Holdings

Reported by multiple sources including Compliance Online, Fin24 and Tech Central, this is the largest data breach in South African history and is ranked the 8th biggest leak in the world as of 19 March 2019. A total of 75 million records were lost, of which 65 million were South African!

“Who are Jigsaw Holdings and why do they have so much data?” I hear you ask. Jigsaw are a holding company for large real estate agencies such as Aida, Realty1 and ERA. It is likely that they used this data for the real estate agents to vet potential clients. Whether or not such a company should even be allowed to store this quantity of personal information is something that should hopefully be managed in the POPI act. You can read about the act here.

How it happened

The information was easily accessible on an open web server. What this means is that the data was simply lying out in the open. No hacking was even required to get to it. Login credentials were apparently displayed in error messages on another site. The same credentials were then used everywhere and gave you full administrator access to every database on the server! It gets better. All the personal data was contained in a single database in plain text. The lack of security displayed here when you are responsible for such a large amount of personal information is truly astounding.

What they lost

Information ranging from ID numbers to company directorships. This opens up many possibilities for identity theft, and if your information has been leaked you need to be very vigilant.


Here is a quick overview of the aforementioned data breaches:

Rank Organisation Breached Records Breached
8 Jigsaw Holdings 65,000,000
16 South African Government 30,000,000
91 ViewFines 934,000
115 Ster Kinekor 1,600,000
333 Government Communication and Information System (GCIS) 33,000


Do organisations report data breaches?

Of the five organisations involved in this research, Ster Kinekor made no statements regarding their data breach. Multiple news outlets attempted to contact them regarding the issue and none of them received a response. The two government agencies that were breached (GCIS and South Africa’s Department of Water Affairs) were breached by hacktivists from the Anonymous collective and broadcast the breach themselves.

In my opinion, most organisations should handle data breaches better. They need to inform the public as soon as they know of the breach so that their affected users can take the required actions as soon as possible.

Woo Themes – a South African start-up – suffered a particularly devastating malicious attack in 2012 (Blast, 2012). They lost all their data including back-ups (Blast, 2012; Chandler, 2014; Haver, 2015). They handled their breach very well, even managing to be commended by members of the public for how they dealt with the situation. The key aspect here was constant communication with the public.

Cost of Data Breaches to South African Companies

The Ponemon Institute (2017) conducted benchmark research sponsored by IBM on the cost of data loss to South African companies in 2016 (IBM, 2016). The research was performed by means of interviews conducted with members of 19 different companies over a ten-month period (Ponemon Institute, 2017). The results of the research set the average total cost of a data breach at 28.6 million Rand with the average cost of a single lost or stolen record set at 1,548 Rand (Ponemon Institute, 2017). It is notable that the research did not include any breaches that exceeded the loss of 100,000 records as this would have skewed the results (Ponemon Institute, 2017).

Digital Foundation (2017) cites the same Ponemon Institute research and reports the total cost of data breaches to the 19 companies involved as being 1.8 million US Dollars. The Ponemon research itself (as stated above) lists this same cost as 28.6 million Rand. Looking at the exchange rate between the South Afrcan Rand and the US Dollar at the time the article was posted (2 February 2017) which was R13.36 per US Dollar, this gives us a total of 24,048,000 Rand  (XE, 2017A). That’s a difference of about four million Rand.

ITweb cites the Ponemon research as well and provides the figures in Rand matching what the Ponemon research says (Moyo, 2016).

Internet Solutions (2017) also refers to the Ponemon research and gives a cost of 1.87 million US Dollars per data breach. The article was published on 15 February 2017 and with the exchange rate at the time being R12.96 per US Dollar, we get a total of 24,235,200 Rand (XE, 2017B). This, too, differs from the Ponemon Institute number by about four million Rand.

What we can conclude from this is that when reporting values in changing currencies, it is best to stick with the currency of the country that you are referring to – especially when dealing with such large values where small changes in the exchange rate can result in large differences in the numbers involved. The numbers from the Ponemon Institute research (2016) are more reliable than any other numbers found, as they work off of actual data from South African companies and not estimations.


Edited by:

Faris Šehović


References

Continue reading

Share

A Star For Beginners

Sanibonani!

The A star or A* algorithm is a widely used, very effective pathfinding algorithm.

I made an application in Processing that is based on the implementation given here:

A Star Tutorial

Here is a video of the application in action:

You can try it out with the desktop application here:

Windows 32 bit:

CLICK ME TO DOWNLOAD THE APP —-> Windows_32_Bit

Linux 32 bit:

CLICK ME TO DOWNLOAD THE APP —-> Linux 32 Bit

Android app here:

GET IT FROM THE PLAY STORE HERE

If you struggle to understand the tutorial, I have made a video that goes step-by-step through the algorithm:

Share

CSE Vision – Part 4 – Time Table Integration

Sawubona!

There has been no progress on CSE Vision for quite some time now but recently I have had a bit of time to work on it. I decided to work on trying to integrate the time table into the system. This would give everyone a good idea of where lecturers are in our department of CSE (Computer Systems Engineering) at TUT (Tshwane University of Technology) during the course of the day.

Our department is given a time table every semester in the form of an Excel workbook. It consists of every subject, lecturer, venue etc. in the FoICT (Faculty of Information and Communication Technology). I had to read all this data in from the workbook, sort through it and get any data about lecturers in our department from it. Most notably what time their classes start and end for all their subjects, and what venue they will be in during that time.

Once I had successfully managed to achieve that, I had to construct a database to store that information. Now that that is done, I can get to the “fun” bit!

Now every time a lecturer’s class starts, their availability status is automatically changed to “in class”. Yes, that is a new availability status. I decided that “in class” needed it’s own status because the “busy” status could also apply to when a lecturer is in their office and not just when they are physically in a class.

Here’s what the new status looks like at the kiosk in the lobby:

Lecturer in class

Lecturer In Class

Once the class passes its end time, the lecturer’s status reverts back to whatever it was before then.

I have also introduced yet another status. One for when I have no data about a lecturer’s status. i.e. They have not said yet what state they are in. To depict this they get a “beautiful” grey coloured card:

inactive

Lecturer Inactive

The system works well at the moment – I just need to cater for events such as public holidays and University holidays where the automatic updates should of course not occur.

This all needs to be done from the admin side which is still some way away from being completed!

Share

One-Dimensional Localization

Guten Tag!

Localization is something that a robot does in order to try and find where it is in a given area.

The Processing sketch below illustrates a localization method for a one-dimensional grid. Before seeing the sketch in action, you need to know a few things about it. The sketch tries to determine probabilistically where the robot is in the world. The world consists of a linear cyclic world containing coloured cells that can either be red or green and the robot can “see” what colour it is standing on by using its on-board camera. The robot has the ability to move to the left and to the right. After moving and sensing a few times the robot should have an idea based on probability of where it is in the world.

Right that’s it! Below are some usage instructions with the sketch below that. Try it out.

Instructions for use:

The world begins with the robot positioned in the first cell, all the cells are coloured red and the robot is in an initial state of maximum confusion (it’s totally lost).

The user can change the colour of the cells by clicking on them. Left click for red and right click for green.

There are then four buttons in the sketch. Two of them issue commands to move the robot (the yellow circle) either one cell to the left or one cell to the right. The other two buttons simulate the feedback from the colour sensor on the robot. One of the two simulates the robot sensing red and the other simulates the robot sensing green.

This of course allows you to simulate receiving false information from a robot’s sensors (robot can be on a green square when the user clicks “Sense Red”).

All these commands then affect the probability of the robot being at a certain point in the world. These are the numbers shown beneath the coloured cells. The higher the probability of a cell, the bigger the belief that the robot is currently at that specific cell in the world.

Right at the bottom of the sketch there are numbered buttons that allow you to change the number of cells in the world. Each time the number of cells changes the world resets (robot is lost again).

CLICK ME TO TRY IT OUT!

So, after moving and sensing a few times, the robot has a fairly good idea of where it is in the world!
It achieves this by implementing a surprisingly simple algorithm. We will look at this algorithm in more detail below.

What does the robot need in order to be able to do this? For starters, it needs a map of the world or area that it is in. It would not be able to localize without this on-board map.
It also needs to of course be able to move to the left and to the right and be capable of sensing the colour that it is standing on.
Furthermore it needs to store the probability of where it is on the map it has. Each cell in the world needs to be allocated a value that represents the probability that the robot is occupying that cell. Due to the fact that the robot starts out not knowing where it is, every cell’s initial probability should be the same value as every other cell’s value. This makes sense if you think about it this way: The robot has no idea where it is so therefore there is an equal chance that the robot could be on any cell in the world.
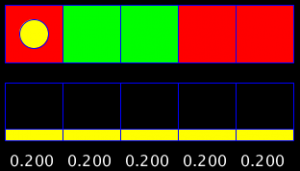
These probabilities should be normalized (all the probabilities added together should add up to 1) to make them easier to work with and easier to visualise.

Below is an example of what this would look like in a 5 cell world:

And here in a 7 cell world:


Now what happens to these probabilities when a colour is sensed?

The cells with colours that match the the colour being sensed have their probability values multiplied by 0.6.

The cells with colours that do not match the colour being sensed have their probability values multiplied by 0.2.

This results in an increased probability of being on the cells whose colours match what was sensed in relation to cells with colours that do not match what was sensed. This makes sense! If you sense red, there is a higher probability that you are on a red cell than on a green cell!

Why not just maximise the probabilities for cells matching the colour sensed and minimise the values for cells with non-matching colours though?

This is because we are working with (or planning to work with) real-life hardware. Unfortunately in the real world, things don’t always go to plan (shocker I know). Especially when working with electronic hardware, things can and do go wrong. The colour sensor may malfunction for example, reading the colour red instead of green or vice-versa and if the multiplication values are too extreme, a single bad reading could completely throw your robot off and it could end up with irreversibly incorrect probabilities! Your robot will be doomed to suffer eternal “lostness”!

“Fun fact” – lostness is not a real word!

Now, what happens to the probabilities when the robot is moved? As you have likely seen from moving the robot around in the sketch, the probabilities move with the robot. i.e. If the robot moves one cell right, all probabilities move one cell to the right. This is known as exact motion. It is assuming that if a move command is issued to the robot that the robot will successfully execute the command (can you see where I am going with this?). Once more we need to think about what would happen in a real life scenario with a physical robot interacting with the world. The robot could try to move and have the wheels slip and as a result not move as far as it planned to. The robot could have an issue with it’s wheel encoders and end up overshooting it’s target. These are things that our code should cater for. Enter – inexact localization.

The sketch below implements inexact localization. Try it out and see how different it is.

CLICK ME TO TRY IT OUT

So, what is happening here exactly? The program is now catering for overshoot and undershoot. It does this by estimating a likelihood that the robot will overshoot and undershoot and then allocating percentages to those likelihoods.

It allocates 10% to overshoot, 10% to undershoot and the remaining 80% is how sure the system is that when a command is issued the robot will reach the intended destination.

So what does this mean for our probabilities?

For each and every probability, 80% of its value is sent to the target cell’s probability. 10% of its value is sent to the following cell in the direction of intended movement (overshoot) and 10% stays where it is (undershoot).

The picture below depicts what the process is like for attempting to move one cell to the right:


The values in the bottom cells are then simply summed up and those values are the new probability values for every cell. This results in the system being able to deal with erroneous data from the sensor every now and then. If the sensors are completely broken then of course it does not matter how fantastic your code is, the system will still fail to localize.

This is such a simple and powerful algorithm that allows your robot to do something amazing. This is only the beginning of localization though (one-dimensional). Think about how something like the Google self-driving car localizes. Believe it or not it does essentially the same thing that we are doing here – just with a far bigger budget 😉

I’m going to leave you with a few things to try out in the sketches. See if you can understand what happens when you do the actions and try to state why you think it happens.

Things to try:

Try issuing various move-sense commands and observe how the probabilities change.

Try doing an initial sense and then moving multiple times without sensing. What happens to the probabilities when you keep on moving without sensing? Why do you think this happens?

What happens when the robot stands on one spot and keeps sensing a single colour?

Change the number of cells in the world. How does that affect things?


Share

Proportional Control Example

Bonjourno!

When learning about different control strategies it often helps to see the strategy in action.
I therefore made a Processing sketch for my students to play around with that illustrates proportional control applied to a motor.
You can see the sketch in action here:
Click me! I’ll take you where you want to go!

The white triangle simulates the angle of a motor (Process Variable – this would be the feedback of a real life system provided by a potentiometer for example)
The red line is used to visualise the set point
Click the left mouse button to create a new set point at the angle you clicked at.

The system will then use proportional control to get the motor’s angle to match the set point’s angle.

You can also press the top left button to turn the simulated friction on and off.
Note how proportional control cannot overcome that friction by itself and remember how integral control is used to solve the problem by generating an output that increases in magnitude based on the length of time that the error exists!

Share

CSE Vision – Part 3 (Desktop Application)

Aloha,

The system has been in use for a few weeks now and it turns out it’s pretty inconvenient for the staff to use.
Even I didn’t feel like logging into the site every time I wanted to change my status.

Solution (well at least before we get the magnetic switches installed):

Make a desktop app that can be set to run at start-up and remembers your username and password so that you don’t have to log in all the time.

Here’s what it looks like:
CSE Vision Desktop Application

Video of it in action:

So to use it you simply enter your username and password and then click one of the three coloured buttons to change your status.
You can also change the message displayed to the students directly from the app by entering it into the text box and then clicking the “Update” button.

It was surprisingly easy to do. I did it in Visual Studio 2013 in C#.

Below is some of the code used:

     url = "http://ictcms.tut.ac.za/censored.php?message=0&&status="+state.ToString()+"&&staffNo=" + username.Text + "&&pwd=" + password.Text;

                HttpWebRequest request = WebRequest.Create(url) as HttpWebRequest;
                WebResponse response = request.GetResponse();
                StreamReader reader = new StreamReader(response.GetResponseStream());
                string responseText = reader.ReadToEnd();
                infoLabel.Text = responseText;
                string passText = password.Text;
                //encrypt pwd

So essentially C# can perform a WebRequest with a specified URL to which I append the variables that I need to send over to the web page.
I then get a response from the page which is streamed into the StreamReader and displayed onto a label on the form.
Thereafter I encrypt the password before storing it along with the username.

I simply store this into a file. This file is then read from when the form is loaded and its contents then populates the username and password fields.

Here is a nice tutorial on basic file handling in C#:
https://msdn.microsoft.com/en-us/library/8bh11f1k.aspx

The WebRequest used above relies of course on you having a php file that can get the data from that URL and store it into the database.

That is simply done as seen here (the GET part):

$staffNo = $_GET['staffNo'];
$status = $_GET['status'];
$pwd = $_GET['pwd'];
$message = $_GET['message'];
Share